Introduction
Welcome to the KEA Planner documentation — your guide to building intelligent, autonomous planning systems with ROS 2 and PlanSys2.
📑 If you have any questions or suggestions regarding this documentation, don’t hesitate to reach out to us! More often than not, a lack of understanding is a result of poor documentation… Therefore, we are always looking to improve it!
Table of Contents (available in the left sidebar)
Overview
Getting Started
Configuration
Subsystems
Examples
Development
Miscellaneous
Overview
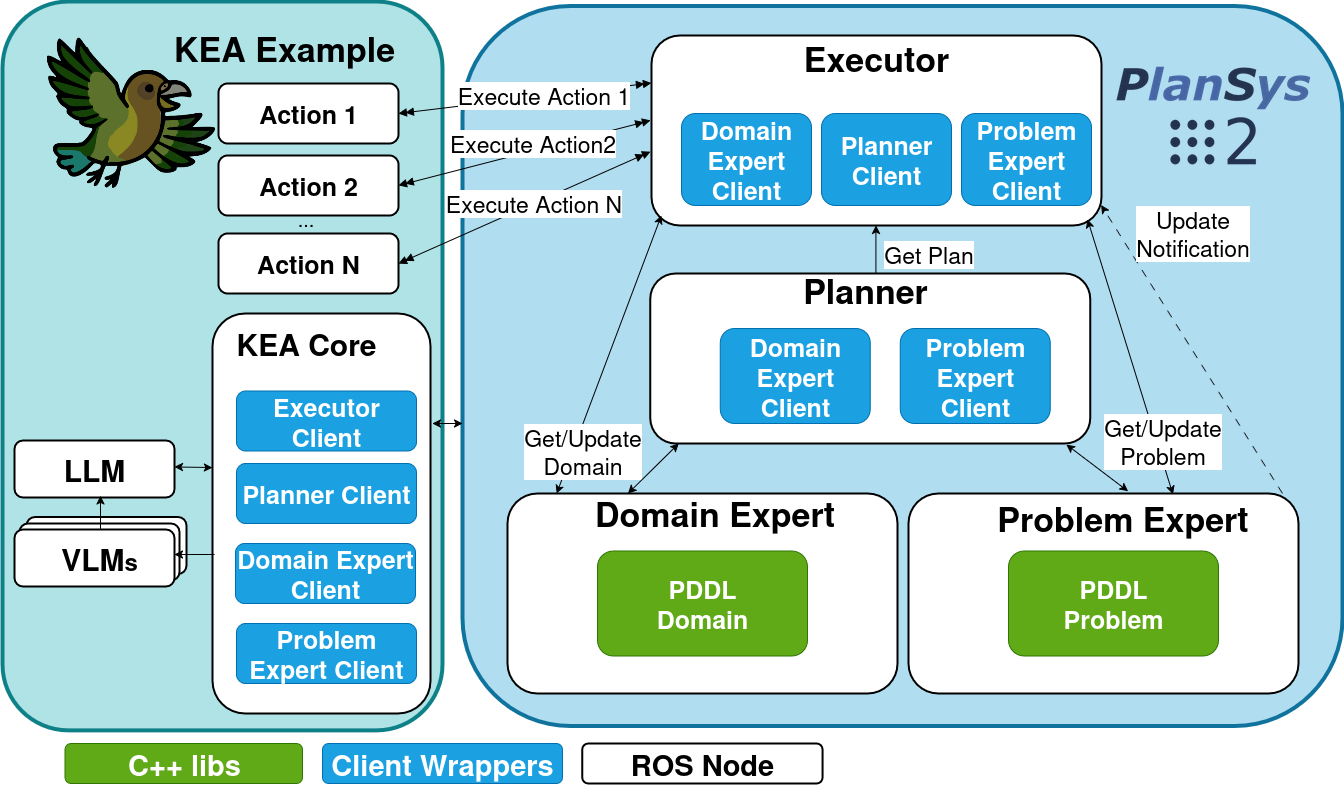
KEA Planner is a hybrid planning stack built on top of ROS 2 and PlanSys2. It keeps the PlanSys2 model of domains, problems, actions, and execution, and adds LLM/VLM-based oversight to detect failures and propose recovery actions.
Any PlanSys2 example can generally run under KEA with minimal changes, as long as you provide a domain and problem file that PlanSys2 can parse.
What KEA adds on top of PlanSys2
- A plan oversight agent (LLM) that observes execution and emits structured recovery commands.
- An optional LLM-backed PlanSys2 plan solver plugin.
- A VLM-based anomaly detection agent for visual safety checks.
- Tooling for PDDL generation and large-scale testing.
Architecture at a glance
KEA extends PlanSys2 with a controller and agent node that sit in the execution loop. The controller mediates between PlanSys2 and the agent, collects execution status, and applies recovery commands from the LLM.
Package layout
This repository is a ROS 2 workspace containing multiple packages. The most important ones are:
| Package | Purpose |
|---|---|
kea_planner_core | Core KEA nodes, launch files, and parameter profiles (LLM/VLM). |
kea_plansys2_solvers | Custom PlanSys2 planner plugin that can call an LLM. |
kea_msgs | ROS 2 message and service definitions used by the controller and agents. |
kea_plan_gen | Utilities for generating PDDL prompts and prototype LLM training. |
kea_testing | Image generation and batch testing utilities for evaluation. |
kea_examples/kea_moleworks | Excavation-style planning example with simulated failure modes. |
kea_examples/kea_rock_breaking | Rock-breaking example using PlanSys2 BT actions. |
Top-level folders of note:
docs/: mdBook sources for this documentation.docker/: Dockerfile and docker-compose definitions for ROS + LLM/VLM services.data/andartifacts/: generated by dvc, datasets and output artifacts (not required for core use).
Current scope and limitations
- The plan-generation training pipeline is a prototype and ships with a debug reward function.
Installation
KEA Planner is a ROS 2 workspace. The repository ships a Dockerfile for a self-contained build and a
docker-compose file for LLM/VLM services. You can either run everything in Docker or build locally on ROS 2.
Option 1: Docker-based setup (recommended)
This path uses the provided Dockerfile to build a workspace image. It is suitable for development and CI.
-
Build the image:
docker build -f docker/kea_planner.Dockerfile -t kea-planner-core . -
(Optional) Start the LLM/VLM services:
docker compose -f docker/docker-compose.yml up -d llm vlm -
Run a shell inside the workspace image:
docker run --rm -it --network host kea-planner-core bash
Notes:
- The compose file maps the Ollama containers to ports
11436(LLM) and11437(VLM) on the host. Adjustllm_agent.endpointandvlm_agent.endpointif you are running these services elsewhere.
Option 2: Native install (ROS 2 Jazzy)
The Dockerfile builds against ROS 2 Jazzy. If you install natively, start from the same distribution.
- Install ROS 2 Jazzy and PlanSys2.
- Install build tools:
sudo apt install -y python3-colcon-common-extensions python3-rosdep - Create and build the workspace:
mkdir -p ~/ros_ws/kea_planner_ws/src
cd ~/ros_ws/kea_planner_ws/src
git clone https://github.com/leggedrobotics/kea_planner.git
cd ~/ros_ws/kea_planner_ws
rosdep init || true
rosdep update
rosdep install --from-paths src --ignore-src -r -y
colcon build --symlink-install
source install/setup.bash
Optional Python dependencies
Some experimental subsystems have additional Python dependencies that are not installed by default:
kea_plan_gen(prompt generation / LLM training):datasets,trl,peft.kea_testing(image generation):diffusers,torch,pillow, and optionalbitsandbytesfor 4-bit models.
Install them in the environment you plan to run those tools in, for example:
pip install datasets trl peft diffusers torch pillow bitsandbytes
API keys for hosted LLMs (optional)
If you use OpenAI or Gemini profiles, set the API key in your shell (e.g., in ~/.bashrc) and reload it:
export OPENAI_API_KEY="your-key"
export GEMINI_API_KEY="your-key"
For OpenAI profiles, set llm_agent.config in the profile to point at your env var, for example:
/**:
  ros__parameters:
    llm_agent:
      config: '{"api_key_env":"OPENAI_API_KEY"}'
Gemini profiles read GEMINI_API_KEY directly.
Quickstart
This section assumes you have built the workspace and sourced it. See Installation for full setup details.
1. Make sure the LLM/VLM endpoints are reachable
If you want LLM/VLM behavior, ensure the endpoints configured in your profiles are running. If you do not
have an LLM/VLM available, set agent_type:=baseline-0 or agent_type:=baseline-1 when launching.
2. Run an example
Rock Breaking
ros2 launch kea_rock_breaking kea_rock_breaking_planner.launch.py
Moleworks
ros2 launch kea_moleworks kea_moleworks_planner.launch.py \
  action_params_file:=`ros2 pkg prefix kea_moleworks`/share/kea_moleworks/params/action_parameters_success.yaml
3. Choose an agent type
The agent_type launch argument controls how KEA reacts to failures:
baseline-0: no recovery logic (reports failure).baseline-1: automatically replan on failure.baseline-llm: use the LLM plan solver plugin for planning.kea-agent: use the LLM plan oversight agent for recovery decisions.
Example:
ros2 launch kea_rock_breaking kea_rock_breaking_planner.launch.py agent_type:=baseline-1
4. Start problems on demand
If you launch with auto_start:=false, the controller waits until it receives a problem request.
You can send one via a service call:
ros2 service call /start_problem_execution kea_msgs/srv/StartProblemExecution "{problem: '/path/to/problem.pddl'}"
See the Configuration section for additional launch arguments and problem input formats.
Configuration
This section covers the small set of settings most users actually touch.
Core launch arguments
Use kea_planner_core/launch/kea_core_planner.launch.py.
domain_file(required): PDDL domain file path.problem(required): PDDL problem file path or inline “set” format.agent_type:baseline-0,baseline-1,baseline-llm, orkea-agent.llm_config_file: LLM profile YAML (see below).vlm_config_file: VLM profile YAML (see below).auto_start:trueto start immediately,falseto wait for/start_problem_execution.sim:trueto simulate VLM output (no real inference).
Example:
ros2 launch kea_planner_core kea_core_planner.launch.py \
  domain_file:=/path/to/domain.pddl \
  problem:=/path/to/problem.pddl \
  agent_type:=kea-agent
Moleworks adds action_params_file (choose from kea_examples/kea_moleworks/params/) and defaults sim:=true.
Rock Breaking uses only the core arguments.
LLM/VLM profiles
Profiles live under kea_planner_core/params and are selected with llm_config_file and vlm_config_file.
Minimum fields:
provider:ollama,openai, orgemini.model: provider-specific model name.endpoint: base URL (empty means provider default).config: JSON string passed to the provider client.
VLM profiles also include:
image_topic: image topic suffix (subscribed as/<robot>/<image_topic>).
If you use hosted providers, set API keys as described in Installation.
Problem input format
problem accepts either a PDDL file path or inline “set” commands:
set instance r1 robot
set instance c1 cell
set predicate (at r1 c1)
set goal (and (visited c1))
A goal is required, and predicates must match your domain.
Start problems on demand
If you launch with auto_start:=false, trigger execution with:
ros2 service call /start_problem_execution kea_msgs/srv/StartProblemExecution "{problem: '/path/to/problem.pddl'}"
Plan solver plugins
The default planner is POPF (configured in kea_planner_core/params/plansys2_params.yaml).
agent_type:=baseline-llm switches to the LLM solver. You can also override with a custom params_file.
KEA Plan Generation
KEA Plan Generation provides utilities to help create PDDL domains and problems using LLMs. The package exposes two CLI tools:
generate_prompt: create prompt datasets from a YAML config.train_llm: prototype RL-based training loop for plan generation.
Generate prompt datasets
The prompt generator expects a YAML config with fields like:
promptcell_grid_size(min_x,max_x,min_y,max_y)cell_contentsnum_robotsgoal_conditionsrobots_typesaction_capabilitiesaction_time
Example:
ros2 run kea_plan_gen generate_prompt \
  --config /path/to/planner_constraints.yaml \
  --num_prompts 50 \
  --output prompts.txt
Train LLM (prototype)
The training script consumes a JSONL database where each line contains at least:
{"prompt": "..."}
Run:
ros2 run kea_plan_gen train_llm --db /path/to/prompts.jsonl --model_name <model>
Notes:
- The training loop currently uses a debug reward function and exits after one run.
- You will need additional Python dependencies (
datasets,trl,peft).
This subsystem is intended as a starting point for building a plan-generation pipeline.
KEA Testing
KEA Testing provides utilities for end-to-end evaluation, anomaly injection, and synthetic image generation. It is designed to help you test failure recovery and collect data for model tuning.
Image generation
The image_gen_node reads kea_testing/params/image_gen.yaml and generates images using Diffusers-based
pipelines.
Run as a ROS 2 node:
ros2 launch kea_testing image_gen.launch.py
Or run the script directly:
ros2 run kea_testing image_generation
The config file contains multiple modes (e.g., txt2img_stable_diff, img2img_flux, txt2img_qwen).
Set mode under ros__parameters to choose which pipeline is used.
Requirements:
- GPU recommended.
- Python dependencies:
diffusers,torch,pillow, and optionalbitsandbytesfor 4-bit models.
Batch testing with multi_launcher
The multi_launcher tool runs multiple planner instances and records outcomes to a JSONL file. Each database
entry must include domain and problem (and optionally problem_file and prompt).
Example:
ros2 run kea_testing multi_launcher /path/to/db.jsonl \
  --launch-package kea_moleworks \
  --launch-file kea_moleworks_planner.launch.py \
  --batch-size 3 \
  --timeout 200
The results are written to multi_launcher_results.jsonl (or the --output path) along with per-run logs.
Moleworks
Moleworks example for testing the KEA planner in digging scenarios.
Running the scenario
ros2 launch kea_moleworks kea_moleworks_planner.launch.py \
  action_params_file:=`ros2 pkg prefix kea_moleworks`/share/kea_moleworks/params/action_parameters_success.yaml
Key arguments:
agent_type: recovery behavior (baseline-0,baseline-1,baseline-llm,kea-agent).sim: simulate action execution (trueby default).action_params_file: action timing and failure probabilities.robot_list: JSON list of robot names (auto-detected from the problem by default).
Simulated failure modes based on action
| robot | action | failure mode |
|---|---|---|
| Excavator | dig | - |
| Excavator | pick rock | - |
| Excavator | drop rock | - |
| Excavator | load dirt | - |
| Excavator | move | cell pairs fail with explicit seed + explicit failure probability |
| Bulldozer | drag material | - |
| Bulldozer | move | cell pairs fail with explicit seed + explicit failure probability |
Failure modes general
random prob of robot breaking down in specific cell
Action parameter sets
The repository provides multiple parameter files under kea_examples/kea_moleworks/params/:
action_parameters_success.yaml: no failures.action_parameters_f0.yaml..action_parameters_f3.yaml: progressive failure settings.
Pass the desired file through the action_params_file launch argument.
Rock Breaking
The rock breaking scenario describes a robot that finds itself in an area with a certain amount of rocks. It will break the rocks until all the chunks reach a certain size.
The order of events is as follows:
-
The robot will scan the area to obtain the count and location of all the rocks.
-
The robot will approach each rock and perform the behavior tree
- Scan the rock for 3d mesh, obtain attack pose tf
- Move the arm to attack pose
- Apply pressure to the rock
- Conditional: Did the rock break? If yes success, if no repeat
graph TD
    RockBreak --> ScanRock;
    ScanRock --> MoveArm;
    MoveArm --> PressRock;
    PressRock --> EvalBreak;
    EvalBreak -->|not broken| ScanRock;
    EvalBreak -->|broken| Success;
Running the rock breaking scenario:
Compile and source the code, then:
ros2 launch kea_rock_breaking kea_rock_breaking_planner.launch.py
This will start the planning nodes, plan and execute. Once the plan finishes successfully, it exits.
Common overrides:
ros2 launch kea_rock_breaking kea_rock_breaking_planner.launch.py \
  agent_type:=baseline-1 \
  auto_start:=true
The launch file accepts the same core arguments as kea_core_planner.launch.py (domain_file, problem, agent_type,
llm_config_file, vlm_config_file, namespace, auto_start).
Contributing - New Example
Thank you for your interest in contributing to the KEA planner! You can add your own planner example scenario and even open a PR to merge it to the main repo!
You can copy the moleworks example and edit it to your liking, we’ll go through the steps of customizing the planner for your specific scenario here:
Create the domain and problem files
Creating the domain and problem files for a certain scenario is usually time consuming.
You have 2 options, either manually create a domain.pddl and problem.pddl file, or use the kea_plan_gen package.
Make sure the domain parses with PlanSys2 and that the problem references valid objects and predicates.
Test the planner
In case you want to see the plan solution before execution you can run the plan solver on it’s own:
ros2 run popf popf domain.pddl problem.pddl
Create the actions
For each action that your system supports you need to create an action node to serve as interface between the planner and system.
Most examples use PlanSys2 BT actions (plansys2_bt_actions) or custom ROS 2 action servers.
Create Agent config files (optional)
Create a config file where you define your LLM and VLM settings and the specific prompts. If not specified, the defaults from kea_planner_core params/llm_profiles/default.yaml, params/vlm_profiles/default.yaml, and params/prompts.yaml will be used.
Create a launch file
Start from kea_planner_core/launch/kea_core_planner.launch.py and include it in your scenario-specific launch file.
Provide default domain_file and problem arguments, then add your action nodes.
Create launch file and launch KEA
New PDDL Solver
PlanSys2 supports multiple planner plugins. KEA already includes an LLM-based plugin in
kea_plansys2_solvers. You can add additional solvers by following the same pattern.
1. Implement the plugin
Create a class that inherits from plansys2::PlanSolverBase and implement configure(), getPlan(), and
isDomainValid(). The kea_plansys2_solvers::LLMPlanSolver is a good reference.
2. Register with pluginlib
Add the plugin to a pluginlib XML file (see kea_plansys2_solvers/kea_plan_solvers_plugins.xml) and ensure
it is exported in the package pluginlib_export_plugin_description_file.
3. Wire it into PlanSys2
Update kea_planner_core/params/plansys2_params.yaml with a new entry under planner.ros__parameters:
planner:
  ros__parameters:
    plan_solver_plugins: ["MY_SOLVER"]
    MY_SOLVER:
      plugin: "my_pkg/MyPlanSolver"
      arguments:
        # plugin-specific parameters
You can also pass a custom params_file at launch time instead of editing the default.
4. Select the solver at launch
Set plan_solver_plugins to your solver name or override the params file with a custom one.
If you want to switch dynamically for a given run, provide a custom params_file using the
kea_core_planner.launch.py params_file argument.
DVC Pipeline
This repository includes a DVC pipeline (dvc.yaml) used to analyze batch-testing results and generate summary plots.
Prerequisites
- DVC CLI installed (recommended via
pip):pip install dvc. - A built ROS 2 workspace with
install/setup.bashat../../install/setup.bashrelative to this repo.
Run the pipeline
From the repo root:
dvc repro
To run a single matrix entry, use its expanded stage name, for example:
dvc repro analyze_multi_launcher@excavator-config0-f0
Plots
The plots: section in dvc.yaml declares CSV and PNG outputs under artifacts/results/. After running the
pipeline, you can view them with:
dvc plots show
Documentation
This documentation is built using mdBook, which creates modern online books from a collection of Markdown files.
Build docs Locally
Install mdBook in your system using these instructions
cd docs
mdbook serve --open
Note: the rendered output under docs/book/ is generated by mdBook. Edit the sources in docs/src/ instead.
Automated Deployment
The documentation is automatically deployed to GitHub Pages via GitHub Actions. The deployment process is triggered by pushing to the main branch.
Contributing
Documentation is usually the weakest link in most open-source projects. We would greatly appreciate your help in improving this documentation. If you find any errors or have suggestions for improvements, don’t hesitate to open an issue or a pull request. Thank you in advance!
Troubleshooting
1. How to debug errors in PDDL?
Working with PDDL is difficult. If the PDDL domain is not well designed, or predicates or instances are missing, it is impossible to generate a plan. Plansys2 will notify you, but it is difficult to debug and solve the problem.
It is possible to execute the plan solver in isolation using the command:
ros2 run popf popf domain.pddl problem.pddl
For more help use:
ros2 run popf popf -h